Installing Oracle Database Express Edition on a Mac
1. Download and install the latest VirtualBox version available from here
2. Find and download and Oracle VM image with a prefigured Oracle Database XE that best suits you from here
3. Open VirtualBox and go to File -> Import appliance and select the SDP_VM.ova file you downloaded.

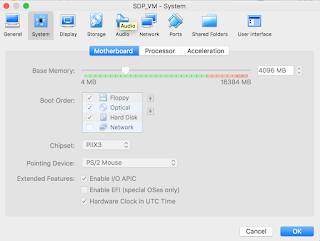
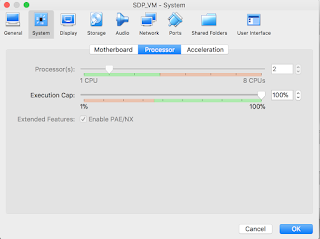
4. Configure your VM to be able to use up to 4096MB of RAM and up to 2 CPU cores. You can do that by selecting Settings on VirtualBox main window and then navigating to the screens below.
5. Go to File -> Host Network Manager and create a host network manager with the default values.

6. Now click start on the VirtualBox main windows and once the VM mounts, enter the password: oracle.
7. Open a terminal in the VM and type: "sqlplus sys as sydba", then enter the password: manager.

8. Next enter the command "startup" in the terminal to start the database server instance.
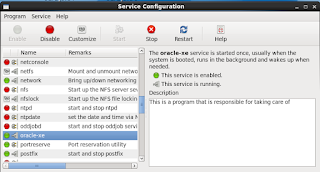
9. Navigate to System -> Administration -> Services and enable oracle-xe service, in order to start the database server instance whenever you start the vm.
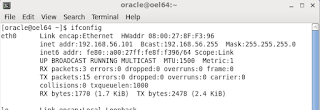
10. Find the VM ip by opening a terminal and entering the ifconfig command. Look for ip next to "inet addr" string.
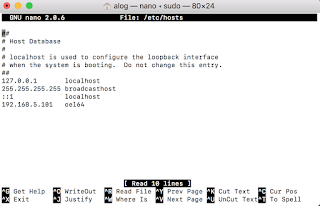
11. On your host MacOS open a terminal and enter "sudo nano /etc/hosts" and enter one more row "192.168.56.101 oel64", then save and exit nano. Of course replace with the ip you found in the previous step.
12. Flush your dns with entering one more command on terminal "sudo killall -HUP mDNSResponder"
13. To ensure you have done everything correctly, try to connect from Mac to the VM by opening an ssh connection from terminal by typing "ssh oracle@oel64" and using the password oracle.
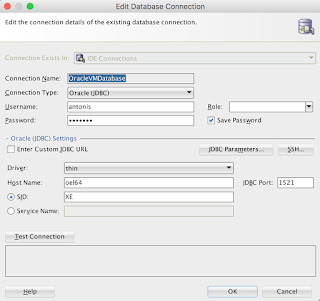
14. If you have connected successfully, then proceed on creating a user in order to connect to the database. Type the following commands:
2. Find and download and Oracle VM image with a prefigured Oracle Database XE that best suits you from here
3. Open VirtualBox and go to File -> Import appliance and select the SDP_VM.ova file you downloaded.

4. Configure your VM to be able to use up to 4096MB of RAM and up to 2 CPU cores. You can do that by selecting Settings on VirtualBox main window and then navigating to the screens below.

5. Go to File -> Host Network Manager and create a host network manager with the default values.

6. Now click start on the VirtualBox main windows and once the VM mounts, enter the password: oracle.
7. Open a terminal in the VM and type: "sqlplus sys as sydba", then enter the password: manager.

8. Next enter the command "startup" in the terminal to start the database server instance.
9. Navigate to System -> Administration -> Services and enable oracle-xe service, in order to start the database server instance whenever you start the vm.

10. Find the VM ip by opening a terminal and entering the ifconfig command. Look for ip next to "inet addr" string.

11. On your host MacOS open a terminal and enter "sudo nano /etc/hosts" and enter one more row "192.168.56.101 oel64", then save and exit nano. Of course replace with the ip you found in the previous step.

12. Flush your dns with entering one more command on terminal "sudo killall -HUP mDNSResponder"
13. To ensure you have done everything correctly, try to connect from Mac to the VM by opening an ssh connection from terminal by typing "ssh oracle@oel64" and using the password oracle.
14. If you have connected successfully, then proceed on creating a user in order to connect to the database. Type the following commands:
- sqlplus sys as sysdba;
- sqlplus sys as sysdba;
- create user mydba identified by mydba;
- create user mydba identified by mydba;
- grant connect, resource, dba to mydba;
- grant connect, resource, dba to mydba;

Comments
Post a Comment