Oracle SOA Suite 12c LDAP Adapter tutorial
This post is based on the previous article on how to install ApacheDS and Apache Directory Studio.
You can find the full source code for the current article on GitHub here.
The article is separated in the following sections:
To setup our example, we need to create an LDAP partition to store our users. In order to do this:
Section 2 - Configure WebLogic LDAP Adapter
In order to configure the WebLogic LDAP Adapter follow the next few steps:
At this point, restart WebLogic server and you are ready to go.
Section 3 - Create a BPEL process which utilizes LDAP Adapter
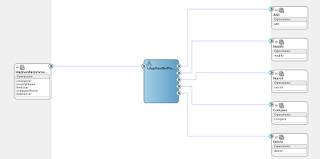
In this example, I have created a BPEL process that invokes several LDAP JCA bindings. The LDAP Adapter Operations used in the implementation are the following:

You can find the full source code for the current article on GitHub here.
The article is separated in the following sections:
- Create a new LDAP partition with a user
- Configure WebLogic LDAP Adapter
- Create a BPEL process which utilizes LDAP Adapter
To setup our example, we need to create an LDAP partition to store our users. In order to do this:
- Open Apache Directory Studio, right click on the ApacheDS connection, click on Open Configuration option and go to the partitions tab.

- You will find two partitions defined by default, as shown below.

- Create a new partition by clicking Add, with ID="myApp" and Suffix="dc=myApp,dc=myCom". Save and close the configuration file.

- Now stop and start ApacheDS.

- Once ApacheDS restarts, go to Apache Directory Studio, navigate to the new partition, right click on it and select "New -> New Entry...".


- Select the organizationalUnit and top object classes.

- Create an organisational unit with a Relative Distinguished Name "users" under your partition. Finally click next under the wizard finishes.


- Now, let's create a user within the users organisational unit. Right click on the ou=users, that should be visible in the LDAP browser by now.

- Select the proper object classes inetOrgPerson, organizationalPerson, person and top, as shown below.

- On the next screen, name your user.

- Edit and add the attributes seen below to your user. Finally, click next to the next few steps of the wizard, you should be able to see the user you just created in the LDAP browser.

Section 2 - Configure WebLogic LDAP Adapter
In order to configure the WebLogic LDAP Adapter follow the next few steps:
- Login to the WebLogic console (http://localhost:7101/console) and locate and click the Deployments link on the left of the screen.

- On the Deployments list find and click on the LdapAdapter deployment.

- Navigate on the "Configuration" tab, then on the "Outbound Connection Pool" tab and click New.

- On the next screen click the next button, then enter the "eis/ldap/ApacheDS" JNDI name and click Finish.


- On the list of connection factories, select the one you have just created. Enter the bindDN, hostname, password and port as show below and click save.

- Save the deployment plan of the LDAP Adapter on a file named LDAPAdapterPlan.xml and click ok.

- Target the Adapter to the Admin Server, if your are working on a local single node development server. If you are working on clustered environment with multiple managed nodes, then target the adapter in the appropriate nodes. Finally, click save.

At this point, restart WebLogic server and you are ready to go.
Section 3 - Create a BPEL process which utilizes LDAP Adapter
- Add
- Delete
- Search
- Compare
- Modify

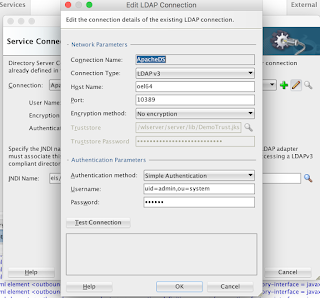
Before you continue with the implementation, you need to create an LDAP connection from JDeveloper. In order to do this, go to the Resources pane and on the LDAP item, right click and select "create New LDAP connection". Fill in the form with your details as shown below. The default password for the "uid=admin, ou=system" user is "secret".

For each reference show on the composite above, drag and drop an LDAP adapter component to the references component lane on the composite editor to begin.
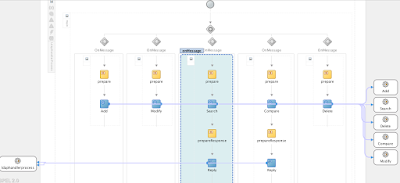
At this point, you should have a composite with LDAP JCA binding references for each operation. To expose this functionality, you will create a BPEL process based on a WSDL with some operations, essentially mapping the WSDL operations with the LDAP operations:
- createUser -> Add
- modifyPhone -> Modify
- findUser -> Search
- comparePhone -> Compare
- deleteUser -> Delete
The create, modify and delete operations are One-Way. Search and Compare are Synchronous. The same applies to the BPEL operations I have created. The interface of the LdapHandlerProcess is described from this XML schema and WSDL. The BPEL process itself is quite simple, each BPEL operation invokes the respective Ldap operation, in the case of search and compare operations a transformation is performed to return the data to the suitable object. 

Let's take a look at each operation's initial transformation, before the call the respective jca adapter.
By looking at the transformations above, it becomes clear that each time you have to construct the correct DN (Distinguished Name) to locate the correct ldap entry.


Comments
Post a Comment